
Hier eine englische Anleitung zum Tausch der hinteren Simmerring Dichtung (Seildichtung) bei einem 350er Buick Block. In der Anleitung wird geschrieben, dass man den Motor ausbaut
Die Anleitung habe ich aus einem Buick Forum, der Verfasser (sean Buick 76) hat der Veröffentlichung hier zugestimmt.
sean Buick 76 hat geschrieben:REAR MAIN SEAL CHANGE
At the back of every motor there is a rear main seal. My 80 Buick 350 was leaking oil out the back of the motor at 120,000 km’s so I just changed the rear seal.
Here is how I did it:
- Remove the oil pan
- Clean the oil off the bottom rear of the block
- Find the small pins that are wedged into small rubber blocks on each side of the rear cap on the oil pan mounting surface. Remove the pins with needle nose pliers then dig out the rubber with a thin screwdriver
- Remove one bolt form the flywheel and spray a little paint in the threads so you can match it back up later now remove the rest of the bolts
- Remove the 2 bolts holding the rear main onto the block
- Using an old flathead and a hammer LIGHTLY tap down on the caps alternating from on side of the crank to the other till it comes out
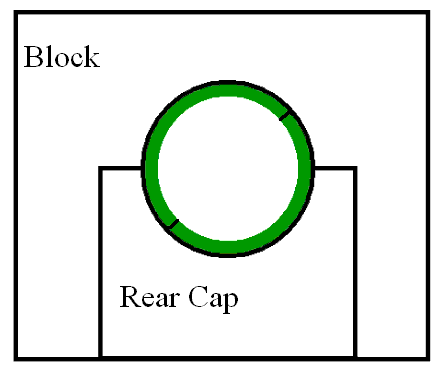
- Inspect the old seal, there should be some rope in the skinny groove in the cap
- If you are going to use a neoprene seal then you just need to remove the old rope. The part in the cap is no problem but you'll need a piece of wire bent to a curve to push out the rope that is up between the block and the crank. It may take some time to get it out but it helps to rotate the motor in the direction you are trying to get the rope out
- With all the rope removed now you need to cut small pieces of scotchbright pads to feed up through were the old rope was to clean it. Use the wire you used before to feed it through. Repeat till the pads come out the other side of the crank clean
- Remove the neoprene seal from the package and apply a thin coat of rtv to the back side of the seal MAKE SURE THE SEAL IS INSTALLED WITH THE LIP FACING INSIDE THE MOTOR.
Slide one half of the seal up into the grove between the crank and the block until there is about 2 inches hanging out. Now you take the other half of the seal and slid it into the groove between the crank and block from the other side. Now you should have the two pieces meeting each other closer to one side on the bottom of the crank.
Cover the top of the cap with a tin coat of rtv. Slide the rear main cap carefully up into the block and ensure with a flashlight that the seal is seated into the groove in the cap then put the 2 bolts in and turn them in by hand
Note: the green is the seal and you can see the black representing where the two halves meet (if you do it this way then it won’t leak at the intersection between the cap and block)- Slide the new rubber blocks into the slots between the cap and block on each side then drive in the metal pins. They must sit flush with the block or the oil pan will leak.
- Torque the main bolts to spec
- Put on the oil pickup cover
- Put on the oil pan, new gasket and a magnetic drain plug from TA
- Find the paint marks you made and put the flywheel back on, torque to spec
- Drop the motor back in and hopefully you will have no more leaks!
Disclaimer: Ich kann keine Gewähr für die Richtigkeit der Angaben hier übernehmen, da ich die Prozedur noch nicht nachvollzogen habe.
Ciao.
Markus Mann